Unlock Perfect Pastries: Master Proving & Prevent Splits in Nigella's Processor Danish
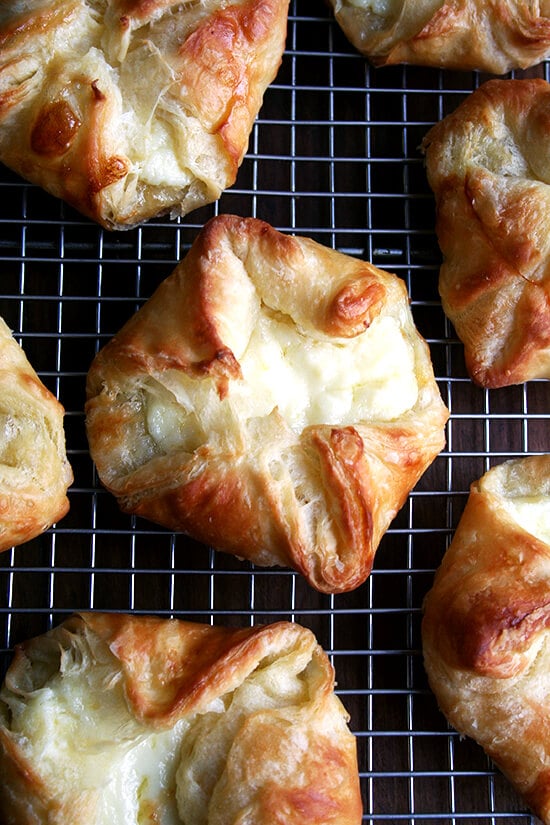
The allure of a homemade Danish pastry is undeniable – flaky layers, a tender crumb, and a delectable filling. But for many home bakers, the journey to perfectly formed pastries can be fraught with a common frustration: split corners that burst open during baking, marring an otherwise beautiful creation. If you've ever found yourself wondering why your carefully pinched dough corners unravel after a stint in the oven, especially when using Nigella Lawson's wonderfully accessible *Processor Danish Pastry* recipe, you're in the right place. This comprehensive guide will delve into the science and art behind achieving flawless Danish pastries, from mastering the crucial proving stage to ensuring your *cheese danishes* or almond variations emerge from the oven looking as magnificent as they taste.
Nigella's *Processor Danish Pastry* recipe, famously featured in her cookbook *How To Be A Domestic Goddess*, revolutionized home baking by taking the intimidation out of this European classic. By leveraging the power of the food processor, she made what was once considered a challenging, time-consuming dough accessible to everyone. This ingenious method creates a versatile dough that forms the foundation for various delightful treats, from her elegant Almond Danish to rich, savoury *cheese danishes*. The convenience of mixing the dough in a processor and letting it rise leisurely in the fridge makes it a perfect make-ahead option for impressive breakfasts or desserts. However, even with this simplified approach, understanding the nuances of baking – particularly proving and oven temperature – is key to preventing those unsightly splits.
The Core Culprits: Why Your Danish Pastry Corners Spring Open
When those neatly pinched pastry corners decide to stage a rebellion mid-bake, it's usually down to one of two primary factors. Understanding these allows you to take preventative action, ensuring your pastries hold their shape beautifully every time. Let's explore the prime suspects behind these baking blunders:
Overzealous Oven Temperatures: The Fast Expansion Foe
One of the most common reasons for pastry corners bursting open is an oven that's simply too hot. When the oven temperature is higher than ideal, the dough experiences a rapid and aggressive expansion. The gasses trapped within the dough, produced by the yeast, expand too quickly for the dough's structure to contain them, especially at stress points like the pinched corners. This sudden "spring" can cause the delicate seals to break, leading to an open, unappealing pastry.
Nigella's recipe typically recommends an oven temperature of 180°C (350°F) for a regular, conventional oven. However, it's crucial to remember that this temperature needs adjustment for fan or convection ovens. These ovens circulate hot air more efficiently, often requiring a reduction in temperature by 10-20 degrees or a shorter baking time. Always consult your oven handbook for specific adjustments, and consider investing in an oven thermometer. Many domestic ovens can be inaccurate, displaying a different temperature than the actual internal heat, which could be unknowingly sabotaging your *processor danish pastry*. A properly calibrated oven is the first line of defense against premature splitting.
The Art and Science of Proving: Don't Overdo It!
Proving, or fermentation, is the magical stage where yeast works its wonders, producing carbon dioxide gas that leavens the dough and develops its flavour. It's an essential step for light, airy pastries. However, there's a delicate balance to be struck; just as under-proving can result in dense pastries, over-proving is a major culprit for splitting corners.
If your *processor danish pastry* dough proves for too long, the yeast produces an excessive amount of gas. The bubbles within the dough become too large and the dough's structure weakens. When such an over-proved pastry hits the heat of the oven, these already oversized gas bubbles expand even more rapidly and forcefully than normal. The stretched and weakened dough at the corners simply cannot withstand this internal pressure, leading to them tearing open.
Nigella provides an excellent tactile test to gauge proper proving: the dough should roughly double in size and feel like a marshmallow – "soft but with a little resistance when you press it." If it feels "very soft and pillowy," it has likely proved for too long. Proving times are never absolute; they depend on various factors including the initial warmth of the dough and the ambient temperature of your kitchen. It's wise to start checking your pastries regularly after the first 45 minutes of proving, especially if your kitchen is particularly warm. This vigilance will help you catch the dough at its perfect "marshmallow" stage, preventing the disastrous effects of over-proving.
Proactive Steps for Picture-Perfect Pastries
Beyond understanding the 'why,' here are actionable strategies to ensure your *processor danish pastry* creations, from Almond Danishes to delightful *cheese danishes*, maintain their structural integrity and stunning appearance. For a deeper dive into common pitfalls, check out
Solve Bursting Corners: Nigella's Processor Danish Pastry Guide.
The Egg Wash Secret: An Adhesive Aid
Sometimes, a little extra help is all you need. Brushing a small amount of egg wash (typically a beaten egg with a splash of water or milk) onto the inside surfaces of the dough corners just before you pinch them together can act as a powerful adhesive. The protein in the egg cooks and "glues" the dough layers together, creating a stronger seal that is less likely to break during the rapid expansion in the oven. This simple trick adds an extra layer of security to your carefully shaped pastries.
Precision in Pinching: Secure the Seam
While egg wash helps, the initial pinching itself is paramount. Ensure you pinch the corners *firmly* and *securely*. Think of it as creating a strong seam. Don't just lightly press; truly meld the dough together. This is particularly important for filled pastries, as the filling can put additional stress on the corners. A well-executed pinch creates a robust barrier against the internal forces of expansion.
Oven Calibration & Monitoring: Your Baking Best Friend
As mentioned, an accurate oven is non-negotiable. Regularly check your oven's temperature with a separate oven thermometer. If your oven consistently runs hot, adjust its setting accordingly. Even during baking, keep an eye on your pastries. If they seem to be browning too quickly or expanding aggressively in the first few minutes, you might need to slightly reduce the temperature or open the oven door for a brief moment to let some heat escape (but do this sparingly to avoid heat loss).
Understanding Your Dough: The Marshmallow Mantra
The "marshmallow test" is your best indicator for perfect proving. Get to know how your dough feels. Gently press it with a finger. If it springs back slowly with a slight indentation, it's usually ready. If it springs back immediately, it needs more time. If your finger leaves a lasting imprint and the dough feels flimsy, it’s likely over-proved. Pay attention to the visual cues too – has it doubled in size? Experience with Nigella's *processor danish pastry* dough will build your intuition, making you a master of the prove. Remember, environment matters; on a warm day, proving will be much faster than on a cool day.
Beyond the Basics: Elevating Your Danish Experience
Mastering the proving and baking process for Nigella's *processor danish pastry* opens up a world of delightful possibilities. Once you're confident your corners will stay intact, you can truly experiment with fillings and shapes. From the classic Almond Danish, with its rich frangipane, to the savory satisfaction of *cheese danishes* topped with a sprinkle of herbs, the versatility of this dough is astounding.
Nigella's recipe also wisely suggests that the dough yields double the amount needed for a single tarte, with the other half being perfectly freezable for a later date. This feature makes preparing a batch of *processor danish pastry* incredibly efficient. You can spend an afternoon making the dough, bake some fresh Almond Danishes for brunch, and then freeze the rest for an impromptu batch of *cheese danishes* or fruit-filled spirals whenever the craving strikes. The joy of having homemade Danish pastry on hand, knowing you’ve conquered its potential pitfalls, is immensely satisfying. To explore the initial steps of crafting this easy dough, revisit
Unlock Easy Danish Pastry with Nigella's Food Processor Recipe.
Conclusion: Your Path to Perfect Danish Pastries
Nigella Lawson’s *Processor Danish Pastry* recipe truly demystifies what many perceive as a challenging bake. While the food processor makes the dough itself a breeze, the art of achieving perfectly formed, un-split pastries lies in understanding and controlling the crucial stages of proving and baking. By paying close attention to your oven temperature, adjusting for fan-assisted models, and mastering the subtle "marshmallow feel" of a perfectly proved dough, you can confidently create stunning Danish pastries. Embrace the egg wash trick, pinch those corners with purpose, and trust your intuition. Soon, you’ll be effortlessly turning out beautiful Almond Danishes, decadent *cheese danishes*, and any other variations your heart desires, free from the frustration of bursting corners, and full of the joy of homemade perfection.